FREE SHIPPING

In early 2009 I was shooting an ad campaign and catalog for Chef Works at a Bulthaup kitchen showroom. The owner’s two French bulldogs, Gaston and Napoleon, kept wandering onto the set and into the picture. Rather than ask the gracious owner of the store to keep her dogs away, I opted to include the dogs in some of the shots. At the end of the day, some of the most evocative and winning shots featured the dogs as the centerpiece. I enjoyed working with the dogs so much I started thinking about someday making a photo book of dogs.

Well, ‘someday’ quickly became next week, when I learned just how many dogs and cats enter shelters every year and the dramatic effect the recession and housing crisis were having on rescues. There was an immediate sense of urgency, as I knew I could help to bring attention to the crisis.
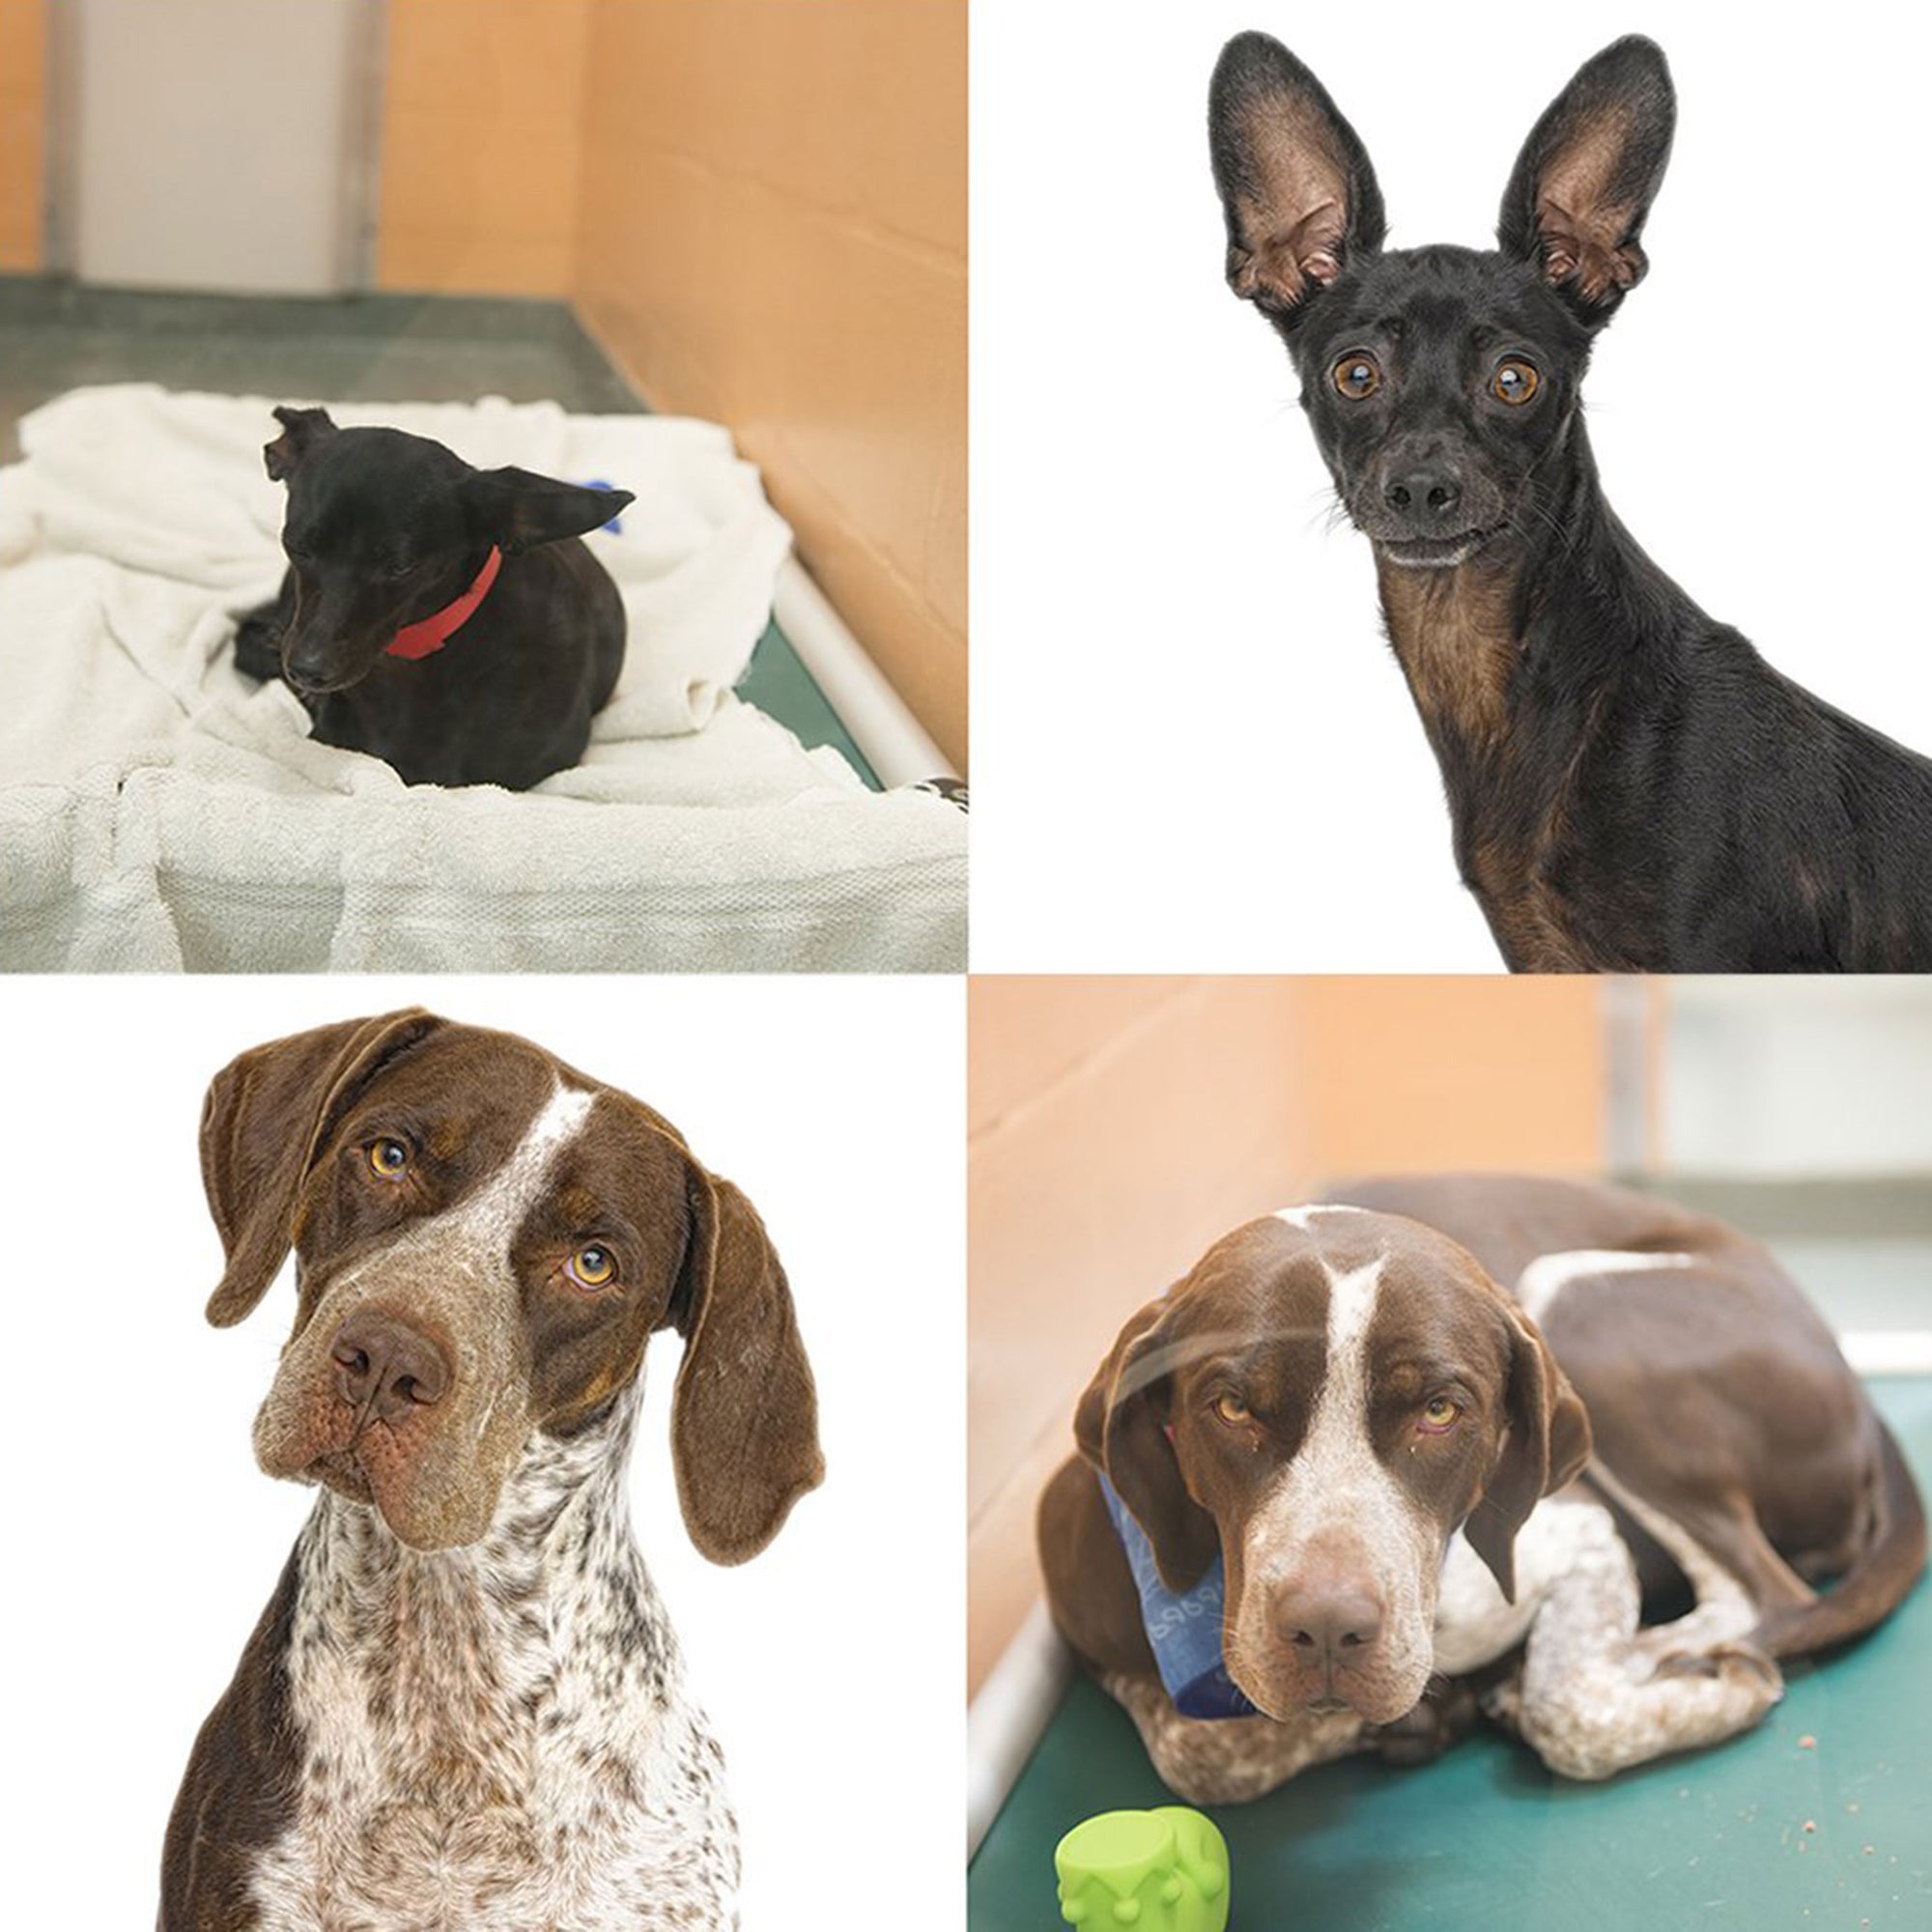
My first dog shoot didn't go so well. I placed my first subject, a large husky, on a large table with a rather slippery surface. He slid around and clearly wasn't very comfortable. I quickly determined I would have to photograph the dogs while lying on the floor with them. Those first few shoots were very difficult and I didn’t capture many compelling shots, as I had very little experience working with dogs and knew very little about training them. Eventually, I learned how to make my subjects more comfortable and how to elicit and capture compelling expressions that capture their diverse personalities.
During the next six years, I photographed over 500 dogs dogs while producing four editions of Rover, a coffee table book of dogs in the studio. I'm now a much better dog photographer, but there were many bloopers along the way...
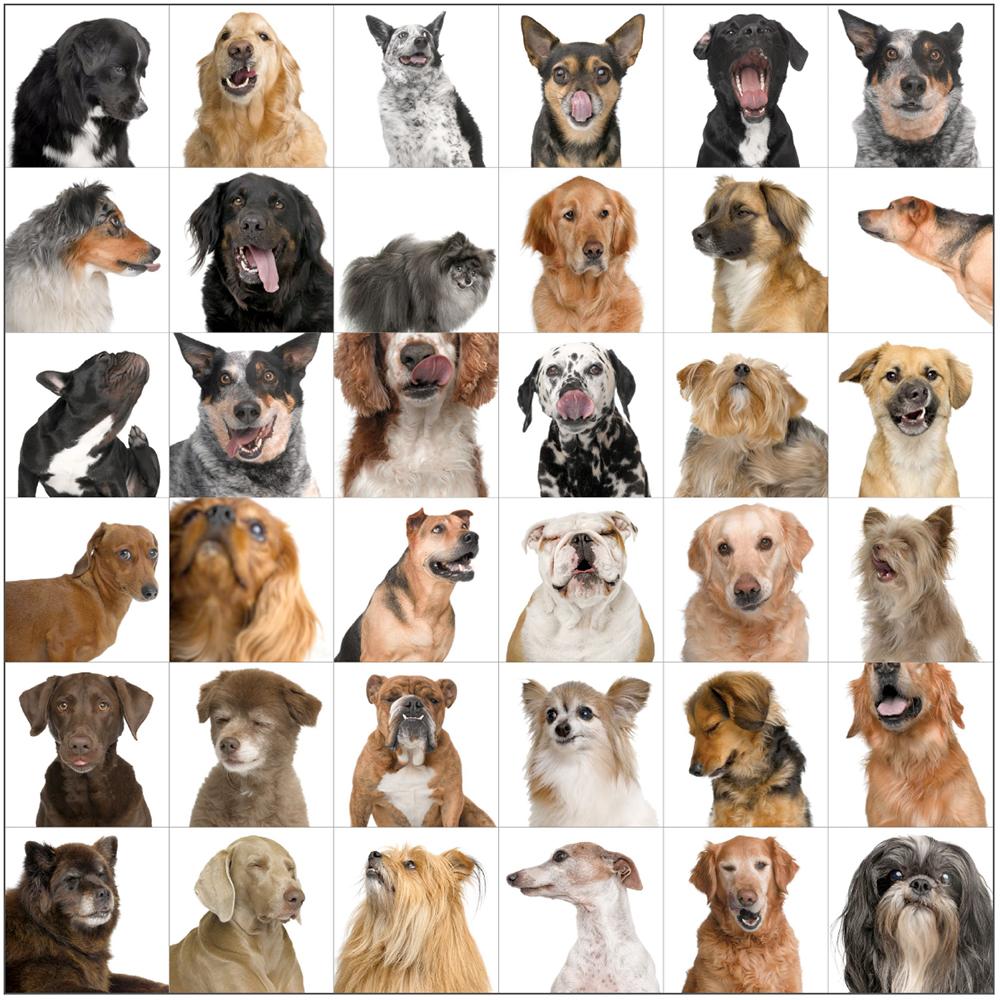
Photographing dogs is not easy. While some dogs enjoy being photographed, it can take a few hours to get a camera-shy dog to surrender just two or three focused and compelling shots. It's especially difficult to photograph dogs in the studio. They move fast. They blink. They lick. They scratch. They pant. They sniff. They bark. They yawn. They worry. They drool and on and on. Some don’t like the unusual feel of the vinyl floor. Some don’t like the sounds of the camera. Some don’t like it when my face disappears behind the large camera. And some are afraid of the sound or flash of the huge studio lights. That’s when things become really difficult.
While most dogs don’t notice the bright flash of the studio lights needed to illuminate them, I've encountered a few dogs who jump virtually every time the scary strobes are fired. Not surprisingly, these dogs are also afraid of lightning and thunderstorms. In some cases, the dog quickly makes the association between the flash and me pressing the button on my “lightning machine.” When that happens, it’s nearly impossible for Andrew to compose, focus and get the perfect shot, as the dog will run off each and every time I hold up the camera.
One such dog was Maverick from Sun Valley, Idaho. Maverick bolted off the set each time Andrew held up his camera and fired the strobe. Maverick’s owner simulated the process at home with the hope that some gentle training would help the yellow lab overcome his fear of the camera. Instead, Maverick now runs from the room whenever anyone holds up their hand and says “Click!”
Assuming you don't have a dog who is afraid of cameras or flashing lights, you should be able to capture some great shots. Here are some tips that will make it easier to photograph your best friend.
1. Be patient. We allow two hours per studio session. Sometimes we need the entire session to capture just one compelling shot, other times we're able to get the shot(s) we need in just minutes.
2. Identify your dog's unique characteristics. What makes your dog unique? A funny profile? Big ears? Skinny legs? A long torso? A beautiful coat? A fluffy tail? Then figure out how best to highlight that feature in a portrait.
3. If you're shooting in an unfamiliar place (e.g., studio, park, etc.), let your dog sniff around and get familiar with the new surroundings before getting to work.
4. When I decided to photograph dogs, I wanted to create images so lifelike it would appear that the dogs could leap off the pages and into your lap. The very expensive medium format cameras and lenses I use allow me to capture virtually every hair and whisker. Those tiny details add a texture to the image and bring the dogs to life inside Rover. However, in order to capture all that wonderful detail, the image must be razor sharp. Getting a razor sharp image, even in the studio, requires a steady hand and a dog that stays relatively still. Which is why it's important that you train your to sit and stay. It'll be virtually impossible to capture a razor sharp image of your dog unless he or she learns and executes those commands.
5. Dog are smart and crafty. It didn't take me long to discover that once I began giving a dog treats after taking shots of them while laying down, it was difficult to convince them to sit and pose. Why would they want to sit? Sitting is requires more "work" than laying and they just received a bounty of treats while lounging comfortably. As a result, I now always capture sitting shots first before moving onto shots of them laying down.
6. Get down! It's not a command I offer to dogs, but rather an invaluable tip to anyone wanting to photograph their dog. Rather than taking a photo from the typical overhead perspective, (which diminishes the size and impact of the subject), get down and photograph the dog at eye level. That means lying down on the floor. The result is a compelling and unique angle that magnifies the subject making your dog look bigger than life.
7. Eye contact. There's so much life in a dog's eyes. I feel the only way to capture a dog's unique personality and a soulful portrait is to get a shot of the dog peering deep into the camera lens. There's no faking it. It's impossible to redirect a dog's eyes in Photoshop to make it appear he or she is looking into the lens.
8. So how does one get a dog to look directly into a lens? Each time one of our my clients sees me struggling with their dog their first inclination is to stand behind me and wave their arms. However, standing behind the photographer will only obstruct the lighting and cast a shadow on the subject. Secondly, the dog will be looking above the lens and that will be obvious in the photograph. Instead, hold a treat near the lens and present your best friend with a treat each time he or she looks into the lens. This is an especially effective technique in the studio as I am usually able to train a dog in several minutes to expect a treat immediately after looking into the lens and the flash (or strobe) fires. Our client's second instinct is to command their dog to "look at Andrew" or "look at the camera." Although I've met a few dogs who were trained to look at the camera, this is usually a very failed tactic that only serves to confuse the dog. The dog will respond to the photographer if he/she is the only one voicing commands and presenting treats. Therefore, politely request that everyone else around you remains quiet so the dog and the photographer can work together.
9. I've encountered many dogs who simply want nothing to do with a big, black, scary camera aimed in their direction. Although we've been able to trump the dog's fear of the camera with a piece of steak, some dogs just don't want to be photographed. Especially skittish dogs will eventually go into "ignore mode" and turn away from the camera each time its pointed in their direction. Once that happens, there's virtually nothing you can do to convince the dog to look into the lens. Your best bet is to photograph skittish dogs where they're happiest at most at ease (e.g., on your couch, in the backyard, in the car, etc.).
10. Have your dog groomed a few days before the shoot. Your dog's coat may be a bit too shiny for the camera immediately after a grooming. Find a skilled and patient groomer that can give your best friend a symmetrical cut. Ask the groomer to cut away any hairs that may obstruct your dog's eyes. If light can't see your dog's eyes, you won't capture your dog's personality. If that's not possible, find a pet friendly hair spray (it exists), spray the hair product into the palm of your hand and gently move away hairs or fur that may prevent light from reaching the eyes.
11. Once you have your dog posed and regularly peering into the lens it's time to make a fool of yourself. My favorite portraits of dogs typically feature a great expression on the dog's face. Soliciting that type of expression requires that you use your full arsenal of whistles, buzzes and voices along with squeaker toys, etc.
12. Give your dog a break. Modeling is demanding and tiring work for dogs. They're working hard to please the photographer to earn treats. Be sure to give them periods of rest during the shoot and encourage everyone to let the dog does his or her thing during her time off.
13. Panting doesn't equal smiling. "Oh look, he's smiling" is a response I often hear when a caretaker sees a photograph of their dog perspiring (panting). Dogs express emotions in their eyes and their ears, not with their tongue. My favorite shots usually feature raised ears accompanied with a bright, attentive, alert and vibrant expression.
Visit dog photographer Andrew Grant's gallery of dog portraits at AndrewGrantPhoto.com